“DAVID LETTERMAN’S; THE 10 SINS YOU SHOULD NOT IMPOSE ON A RIB-EYE STEAK!”
“What!? You did what to the rib-eye steaks!? ” and the violins play in that oh so sad heart broken tune of…? “You get the picture though.”
This was a scene a year ago. I had saved enough money to buy four 14 ounce rib-eye steaks for our after Church Sunday BBQ. They were chilling in the fridge doing fine until the “wifey” decided to put a knife into two of them for some beef stew she wanted to create.
By the time I found out it was like…too late. The irreversible had been done. I had to say; any dish served with rib-eye steaks does taste good, but we were now a rib-eye short for Sunday’s BBQ. “CRY BABY!” To the list…
Number 10. Thou shall not take someone else’s rib-eye steak to do God knows what to it!? “Like slathering it with ketchup, it is just not the right thing to do.
Number 9. Thou shall not deep freeze thy rib-eye steak. What’s the point of buying a juicy steak if you gonna throw it in the freezer!? “You risk getting your tongue stuck to it while trying to eat it…or worse; your tongue might suffer frostbite! “OUCH!” Buy it and grill it instead!
Number 8. Thou shall not forget thy rib-eye steaks in the fridge…they will spoil and foul up the place; “YIKES! The pain…the pain!”
NUMBER 7. Thou shall not gulp down your rib-eye steak at the dinner table! “For Heavens Sake; chew it son before it goes down the pipe!”
NUMBER 6. Thou shall protect thy rib-eye steak from man’s best friend. “THAT MUTT of a DOG!”
NUMBER 5 of 10 SINS YOU SHOULD NOT IMPOSE ON A RIB-EYE STEAK. Thou shall not grill your rib-eye steak over unashed coals! It will taste damn awful!
NUMBER 4. Thou shall not drop your rib-eye steak on the grass and feed it to the in-laws expecting them to believe those funky looking grassblades are seasonings! “IT DOES NOT WORK!!!”
NUMBER 3. Thou shall not forget about the rib-eye steaks are still on the GRILL after the hour has passed! You dumb-dumb!!
NUMBER 2. Thou shall not entrust your rib-eye steaks to a guy who has no idea what a grill is! “This GUY is not only gonna char the steaks; but is likely to burn down the HOUSE!!”
NUMERO UNO of “THE 10 SINS YOU SHOULD NOT IMPOSE ON A RIB-EYE STEAK”…
“Who gives a *%#^!!!” EatYOUR rib-eye steak anyway you want to!!! You bought it!, Your the cook!, Who cares what other people think!, etc…etc…
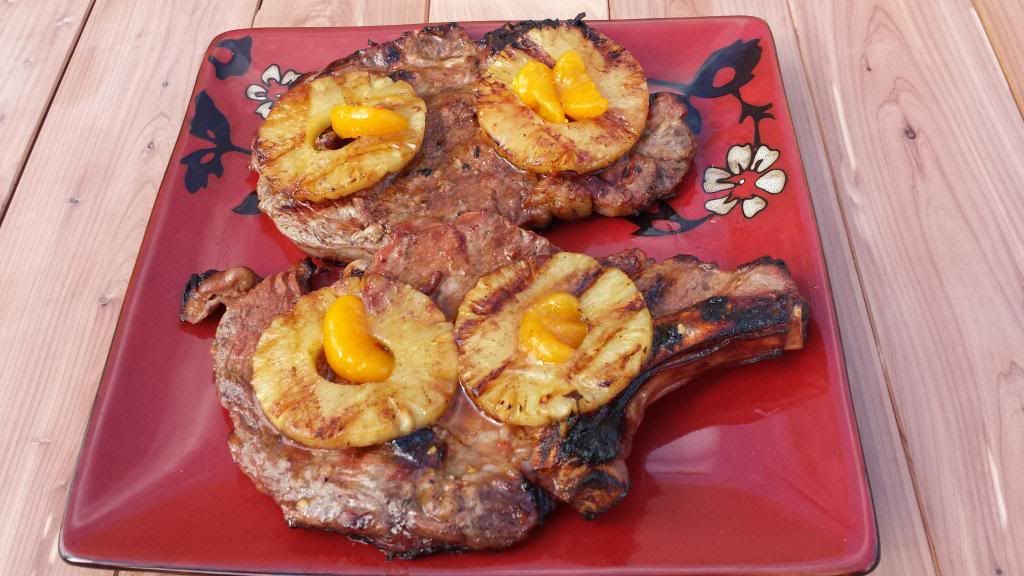
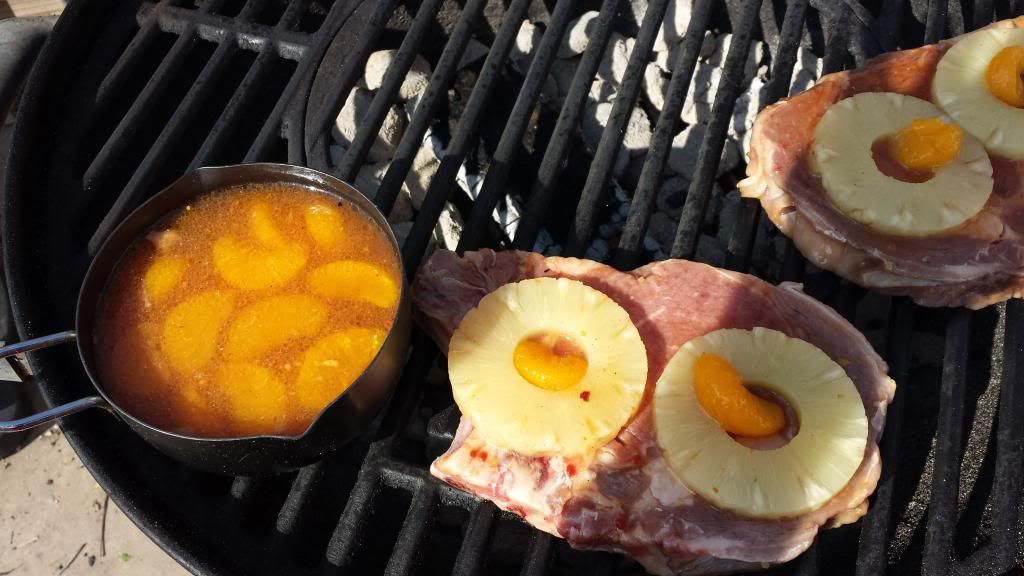
These juicy pair of rib-eye steaks could have been called “The Pineapple Duo Rib-eyes!” or “Juicy Rib-eye Steaks With Flavors of the Tropical Islands!” Hmm, that doesn’t sound too bad? After all, does Hawaii even have pineapples or tangerines oranges?
Some time later…
Yes they do! Gotta love Google Search; its just super fast and awesome! So I will stick to the original recipe name of “HAWAIIAN RIB-EYE STEAKS” And why not?! Its my post and blog; also, I’m the CHEF OF THE HOUSE! Ha-ha!
Have you ever gotten the “I don’t know what kind of sides I should cook syndrome?” You sometimes don’t know what to pick, you cooked that side yesterday, that side the day before, and it goes on and on. We home cooks run out of ideas of what to cook as sides; to include cook those sides with what?
So, going over the cans and stuff of “I don’t know what I have in the pantry”; in our kitchen cabinets I ran into the pineapple and tangerine-orange cans, plus a Lawry’s Hawaiian marinade.
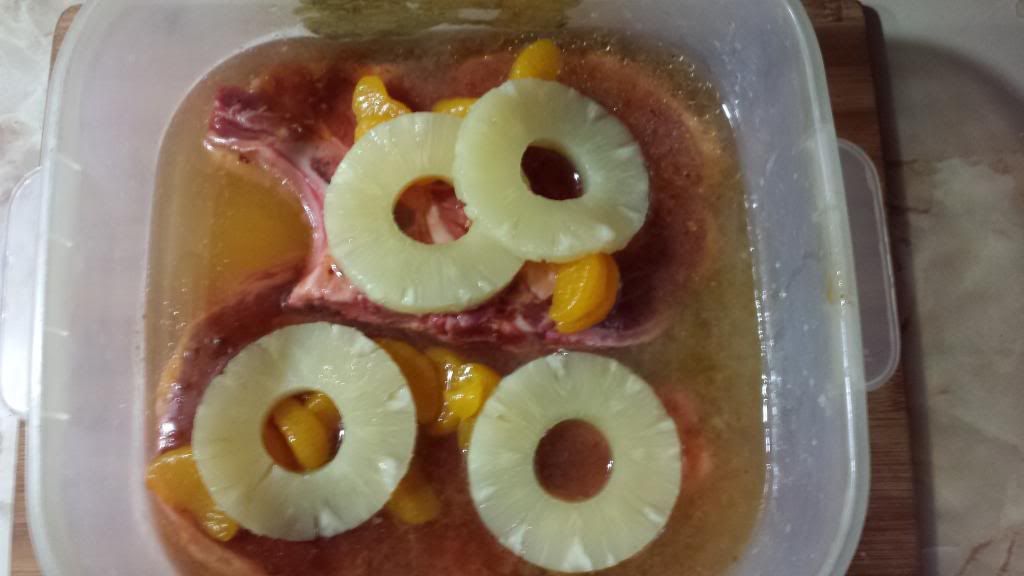
“BAM!” It hit me! Marinade those rib-eyes steaks with all both cans and the Hawaiian marinade and grill the fruits with the rib-eye steaks. As a side all I added where french fries, which I had prepared before the rib-eye steaks hit the grill and kept warm in my George Foreman oven.
Success! The “HAWAIIAN RIB-EYE-STEAKS” were an instant winner. I even saved some of the juices from the marinade and brought them to a low boil on the grill to use as a basting sauce during the last two minutes of grill time and a dunking sauce at the dinner table.
So…this is what I did… I combined the juices of the pineapple and tangerine-oranges in a big container. I added a 1/4 cup of the Hawaiian marinade, 3 tablespoons of olive oil, 1 tablespoon of white wine, and 2 tablespoons of McCormick Grill Mates in Smokehouse Maple. That’s it. I mixed the ingredients well and added the rib-eye steaks before I had started the fire on the grill to give more time to the rib-eyes to absorb the flavors of the marinade.
THE FIRE…
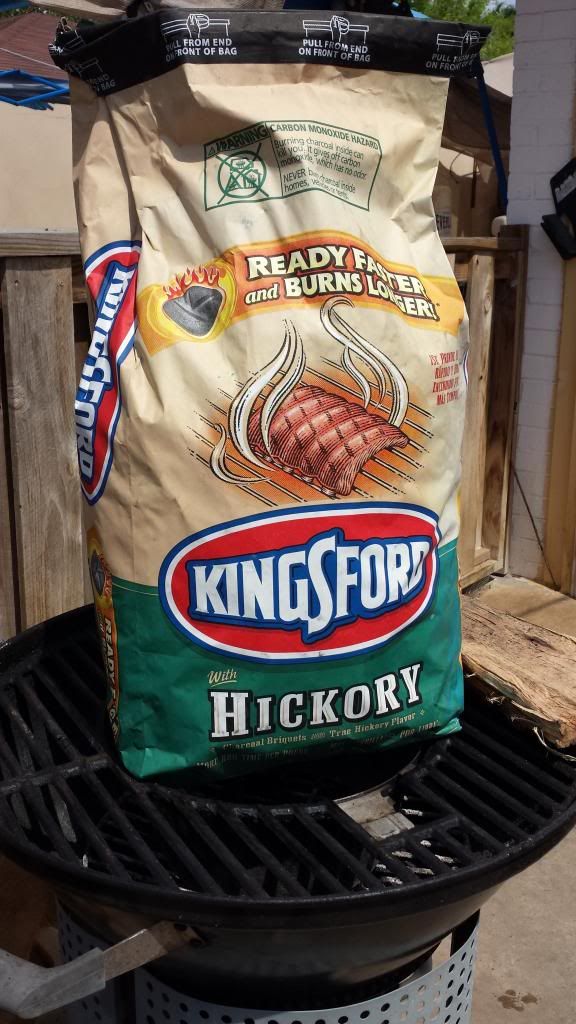
“KINGSFORD HICKORY CHARCOAL”
Todays fire was most successful; it was provided by Kingsford Hickory Charcoal which had Hickory chips imbedded in it. I also used my own Hickory chunks to add a more robust flavor.
“WHERE’S THE BEEF!?”
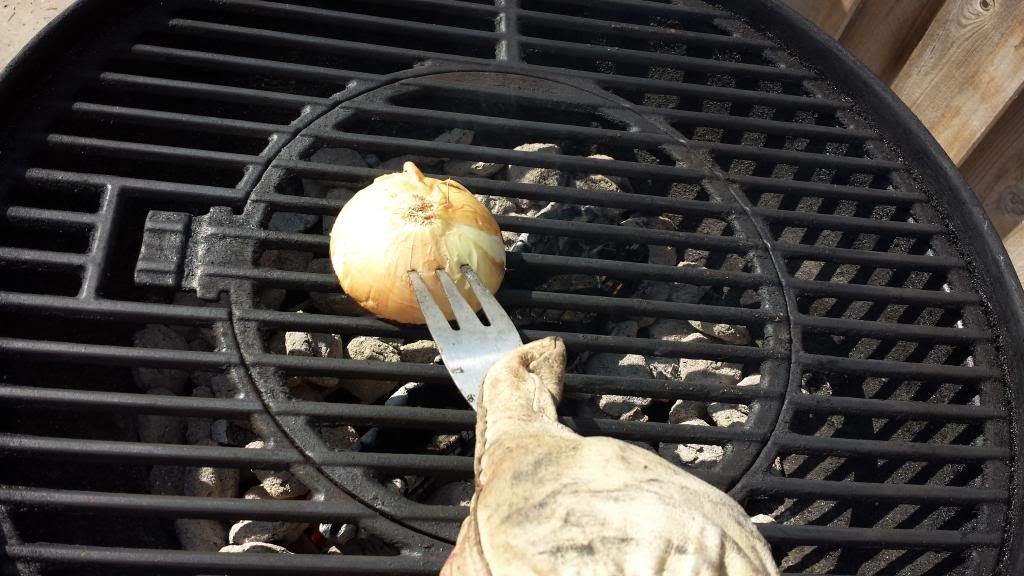
Final-cleaning-of-the-grill-using-an-onion.
After the coals got lit and ashen over, I used a stiff wire brush to clean the grates of the grill, and used half an onion to wipe down the grates for the final cleaning. I leave the half onion there on the grill; it tastes quite delicious, especially when thinly sliced and served with steak or chicken.
AT THE GRILL…
HERE’S-THE-BEEF!
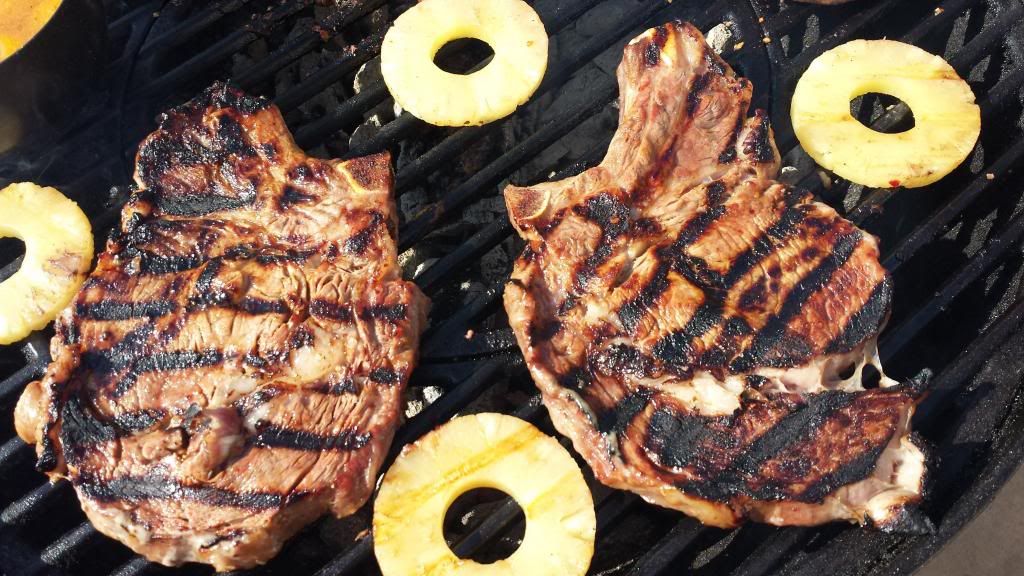
I grilled the rib-eye steaks for a total time of eight minutes. Four minutes per side for medium well. Adjust your timing to suit your taste buds.
I removed the pineapples on placed them directly on the grates to get grill marks on them. After basting the rib-eye steaks with the marinade for the past two minutes for a total of eight minutes of grilling time, the rib-eye steaks were ready to be removed and join the family at the dinner table. Another field goal scored! Yes! The HAWAIIAN RIB-EYE STEAKS were superb in taste!
This Hawaiian Rib-eye Steaks are a major attraction at the dinner table. They are full of rich and tasty flavor that gets the family asking for more at the next BBQ time gathering!
Ingredients
1 twelve ounce rib-eye steak per person
1/4 cup of Lawry's Hawaiian Marinade
1 can of tangerine-oranges with its juices
1 can of sliced pineapples and its juices
3 tablespoons of olive oil
1 tablespoon of white wine
2 tablespoons of McCormick Grill Mates in Smokehouse Maple
Instructions
Combine ingredients and mix well.
Add the steaks and marinade for one hour flipping the rib-eye steaks at the half way point.
Make sure to save some of the marinade and add to a grill proof sauce pan and heat up at the grill.
Grill rib-eye steaks over direct hot coals for four minutes and flip over and continue grilling an additional four minutes basting the rib-eye steaks during the last two minutes of grilling time with the marinade.
Serve and enjoy! You can use the remaining marinade as a dunking sauce.
Notes
The longer you allow the rib-eye steaks to marinade; the stronger and richer the flavor gets.
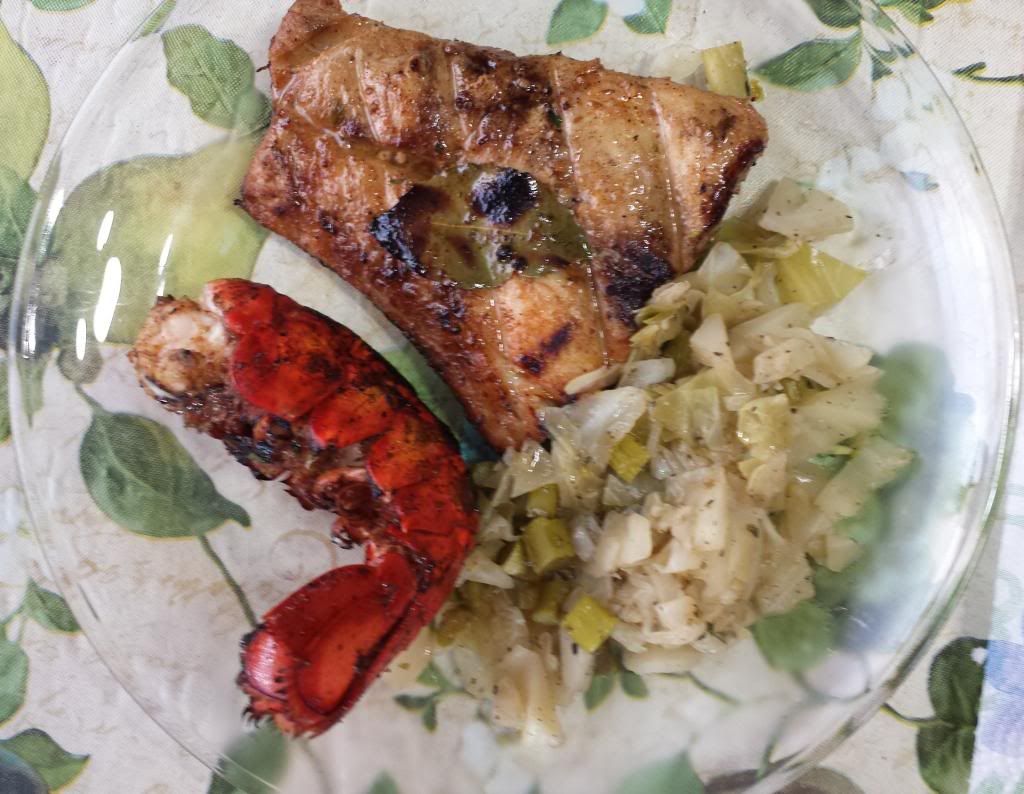
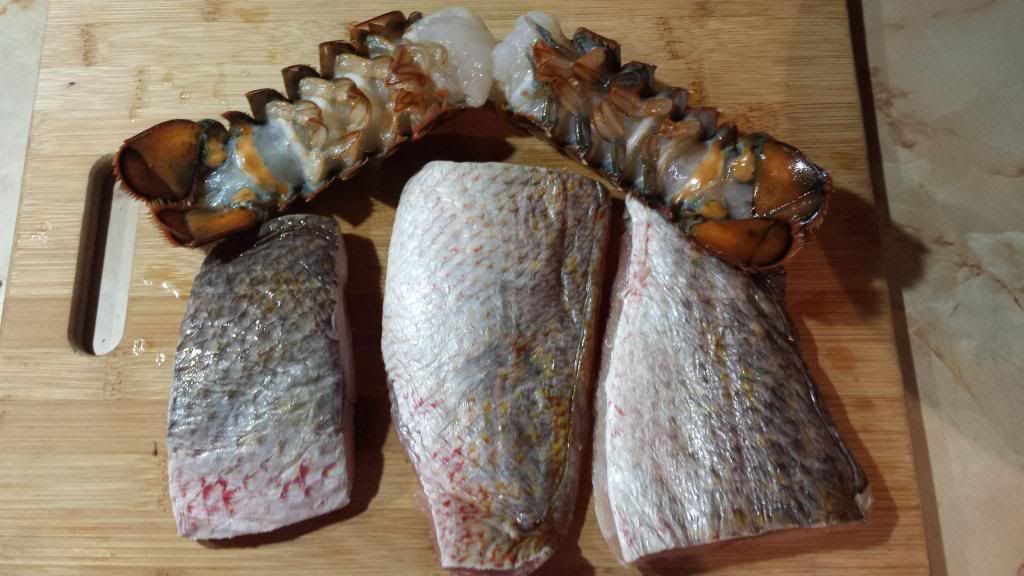
Talking about a really tasty meal here. Dinner called for a marinated red snapper and lobster tails served with a sauce made from white wine, butter, honey, and parsley leaves. Served with slowly cooked cabbage with asparagus as sides. “GRILLED RED SNAPPER WITH A HONEY BUTTER SAUCE” was a home-run; straight out of the ballpark! Everybody loved dinner this evening; as I’m sure your family will too!
Remember, we are talking red snapper here; the recipe for the lobster tails will follow in another post. As for the cabbage and asparagus; that also belongs in another post which I will eventually create a link for very soon. The reason for this is that I have read that we are only suppose to put one recipe per post.
“THE INGREDIENTS”
A-mix-of-ingredients-to-add-flavor.
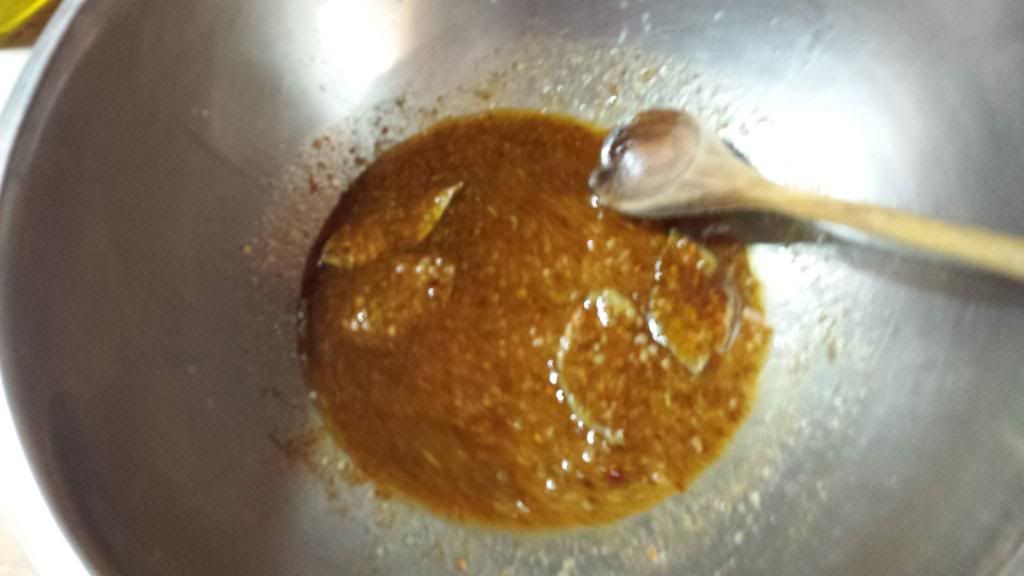
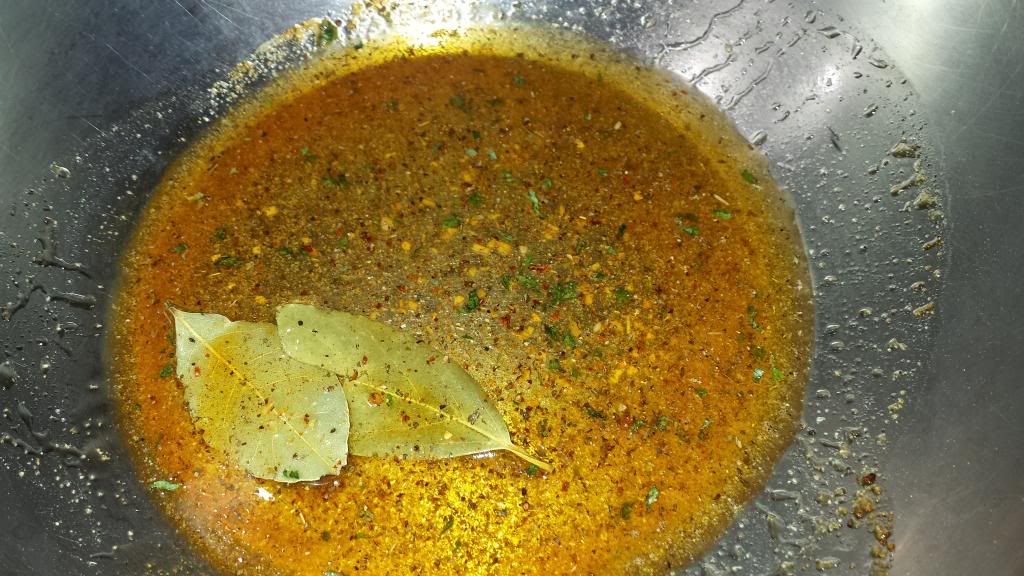
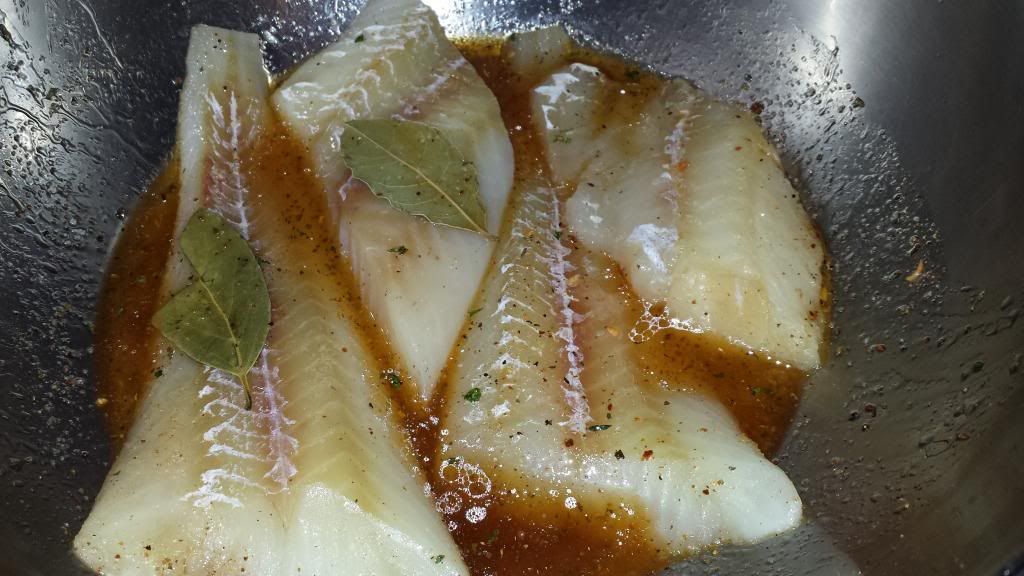
This evening dinner called for a marinade of the following; 1/4 cup of cooking white wine, 3 tablespoons of olive oil, 1/2 teaspoon chile powder, 1/2 teaspoon of crushed oregano, 1 crushed garlic, the juice of 1 lemon, 1/2 teaspoon crushed cumin, 1/2 teaspoon of freshly grounded black pepper, 1/2 teaspoon of coarse salt, 1/2 teaspoon of thyme, 1/2 teaspoon of ground ginger, 1 bay leaf per fillet, and a tablespoon of McCormick’s Grill Mates “Applewood Rub.” I combined the rough seasoning and grinded them fine except the bay leafs and mixed everything together.
For the sauce; I combined a tablespoon of cooking white wine, 3 tablespoons of unsalted butter, 1/2 teaspoon of crushed parsley leaves, and 1 tablespoon honey in a grill proof sauce pan. Yes, I warmed that up on the grilling grates while cooking the red snapper and lobster. I used this mixture to lightly coat both the red snapper and lobster in the last two minutes of cooking time. “Ouch; talking about sweeeeet!”
The recipe for the red snapper was inspired from a cooking book I bought while living in Germany called “Grilling. Where There’s Smoke There’s Flavor” by Eric Treuille and Birgit Erath. An excellent grilling cookbook which I felt should be mentioned. I used most of their seasoning recommendations, but added more to the list to fit my taste buds. “It’s great being the Chef!”
“AS FOR THE RED SNAPPER”
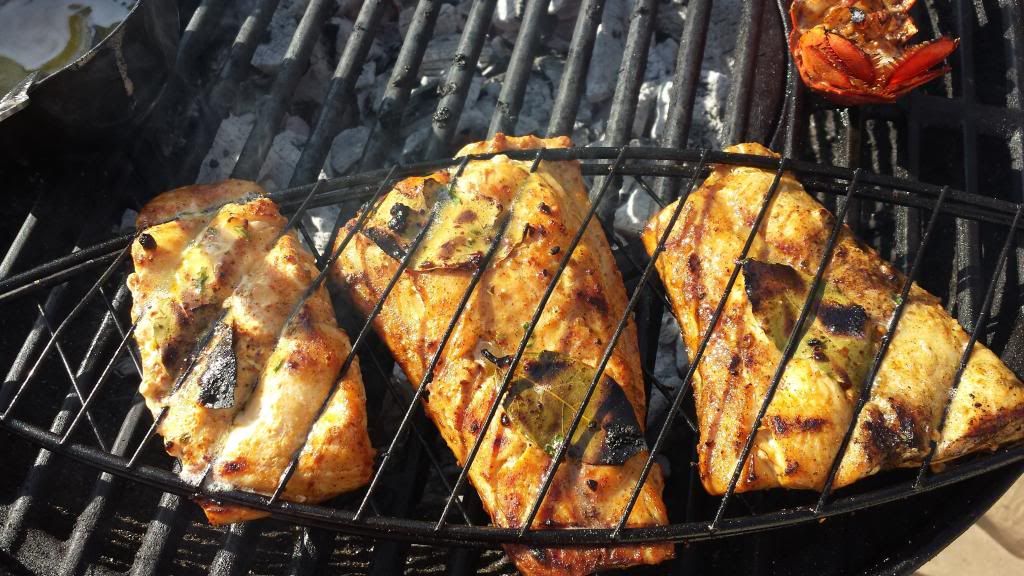
RED-SNAPPER-AND-LOBSTER-TAILS
As for the red snapper, combine all ingredients and mix well. Rinse the red snappers under cold running water and pat dry. Add the snappers to the mix and marinade until the grill is ready for them (normally 25-35 minutes). “In case someone is wondering, I also marinaded the lobster tails in this same mixture.”
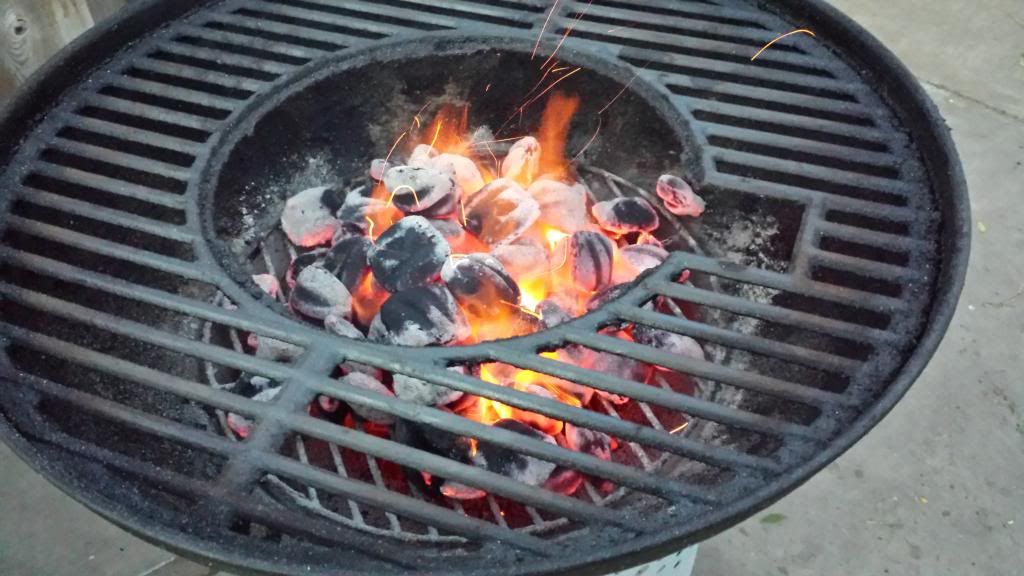
Today’s fire took an additional 10 minutes for me; must be the weather or the mesquite charcoal I was using. It is a local “Cowboy Brand” of mesquite coals. A little tougher to start, but once the coals get started they are good; and gives off that rich strong mesquite smell and flavor. I also added alder wood chips which I had soaking in water for 30 minutes; for that extra punch in flavor.
AT THE GRILL…
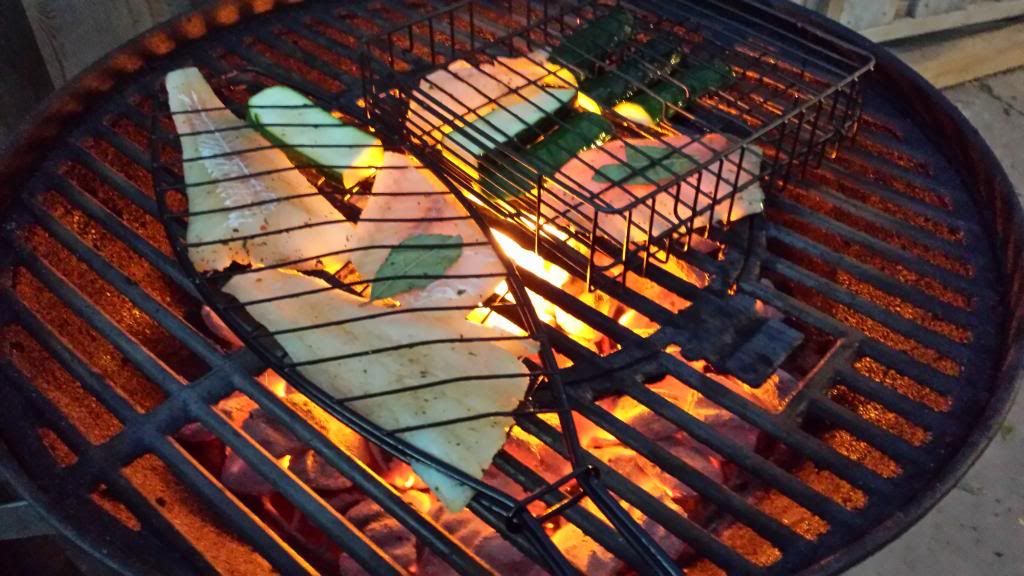
Almost-ready-red-snapper.
I grilled the red snapper and lobster tails for the same amount of time (just in case someone is wondering), which was a total of eight minutes directly over hot coals. I started with the skin up and the shells of the lobster facing up as well and flipped the red snapper and lobster tails over after four minutes had gone by. Grilled an additional four minutes basting with the honey-butter sauce in the last two minutes. I reserved the leftover sauce to be used for dunking the lobster as well. This was a very super tasty dinner!
The Grilled Red Snapper with a Honey Butter Sauce is a must try recipe and a sure winner in anybody's book that likes fish. The red snappers goes to the grill already rich in flavor and comes out mouthwatering full of additional richer flavor! Gotta have some more!
Ingredients
3 four ounce red snapper fillets
1/4 cup white cooking wine
3 tablespoons olive oil
1/2 teaspoon crushed oregano
1/2 teaspoon chile powder
1/2 teaspoon freshly ground black pepper
1/2 teaspoon coarse salt
1/2 teaspoon ground ginger
1/2 teaspoon crushed cumin
1 tablespoon crushed garlic
the juice of 1 lemon
1/2 teaspoon of crushed thyme
1 bay leaf per fillet
1 tablespoon of McCormick's Grill Mates "Apple wood Rub"
For The Sauce:
1 tablespoon white cooking wine
3 tablespoons unsalted butter
1 tablespoon honey
1/2 teaspoon crushed parsley leaves
Instructions
Gather the rough seasoning and ground fine.
Combine all ingredients in a large bowl and mix well.
Rinse red snapper under cold running water and pat dry.
Add red snappers to the ingredient bowl and marinade until the grill is ready for them (25 35 minutes).
Grill red snapper skin-side up for 4 minutes over direct hot coals and flip over for an additional four minutes basting in the last two minutes with the butter honey sauce.
For The Sauce:
Combine the ingredients in a grill proof sauce pan and warm up stirring constantly on the grill. Baste the red snapper in the last two minutes of grilling time and reserve left overs for adding to the red snapper during dinner.
ENJOY!
Notes
Today's coals took ten minutes longer to be ready, but those extra ten minutes meant a longer marinating time for the red snapper making extra tasty.
“Let’s not forget the grilled zucchini, which was lightly oiled with…? “Yes! Olive oil!” and had a very light sprinkle of freshly grounded black pepper and coarse salt.” Everything tastes so much better on the grill!
Speaking of veggies; there is a saying that goes; “An apple a day will keep the doctor away”, or something like that. Well it turns out that eating on1 serving a day of fruit or vegetables might actually add a year to your life span! Whoa!? Who would have taught eating stuff like veggies and fruit would be so beneficial to your health? This same study concluded that eating five serving of veggies or fruit might add three whole years to your life span! If I find that article again I will post some of the information somewhere in this blog. Never the less; the show must go on… Here is the “GRILLED COD MARINATED IN A SPICY WHITE WINE WITH A SPLASH OFLEMON.”
TODAYS FIRE IS BY KINGSFORD CHARCOAL
Kingsford-Charcoal
I do not alway use Kingsford, but most of the times I do because the place I work at (The Home Depot) carries it; making it readily available to me. Coming from Texas; I sometimes use our friendly local H.E.B. brand, which works really good also. I also use mesquite a lot, which is readily available to anyone with a chain saw or a trustworthy axe. As usual, start you coals in advance to allow them to ash over while you prep the lunch or dinner for the day. I am also using Alder wood chips for that added smoky flavor, which I am soaking in a little water.
WINE AND SPICE…THAT’S NICE.
“WHITE-WINE-AND-SPICES”
Not just white wine and spices, but also olive oil. I am using 1 tablespoon of Pompeian Mediterranean Blend olive oil, but any olive oil suited for frying will work fine. I have added a 1/4 cup of Pompeian White Cooking Wine, the zest and juice of 1 large lemon, 1 teaspoon of dried crushed parsley flakes, 1 teaspoon of basil leaves, 1/2 teaspoon of garlic powder, 1/2 teaspoon of paprika, 1/2 teaspoon of freshly grounded black pepper, 1/2 teaspoon of coarse salt, 1 bay leaf per fish fillet. and 1/2 teaspoon of freshly grounded red peppers.
THE COD FILLETS
COD-FILLETS-MARINATING-IN-A-SPICY-WHITE-WINE.
This cods will be chilling for about 20 minutes to 1/2 an hour while the coals ash over and I clean the grill. I do turn them over after 15 minutes so that both sides get marinated.
AT THE GRILL…
COD-ON-THE-GRILL
I managed to lose several bay leaves and two zucchinis to the coals. The cod fillets where safe in the fish baskets I was using, which I really love using. I will say that again…“I LOVE USING THOSE FISH BASKETS!” Especially since the fish doesn’t stick directly to the grilling grates and they don’t stick to the fishing baskets as well since I used oil in the marinade. You could lightly spray the fish baskets with a non-stick cooking spray as well; like Pam cooking spray; in addition to using olive oil (it has really great health benefits).
As for the cooking times… I grilled the cods for exactly 10 minutes; 5 minutes per side. I would have better enjoyed them if I had grilled them for 8 minutes instead of the 10. The problem was the zucchinis needed more time. So…in the next fish grilling time, I will grill the veggies separate from the fish and will grill them a couple minutes earlier. Needless to say, the ”GRILLED COD MARINATED IN A SPICY WHITE WINE WITH A SPLASH OF LEMON” where indeed delicious! The family loved them as I’m sure yours will too.
“GRILLED COD MARINATED IN A SPICY WHITE WINE WITH A SPLASH OF LEMON”
Rating: 41
Prep Time: 30 minutes
Cook Time: 8 minutes
Total Time: 38 minutes
Yield: depends on number of fillets
Serving Size: one 4 ounce fillet
Calories per serving: 90 calories
Fat per serving: 1 gram
Healthy and a real pleasure to eat, this cod fillets marinaded in a spicy white wine with a splash of lemon are easy to prepare and deliciously good!
Ingredients
1 tablespoon olive oil
1/4 cup white cooking wine
the zest and juice of 1 lemon
1 teaspoon of dried crushed parsley flakes
1 teaspoon of basil leaves
1/2 teaspoon of garlic powder
1/2 teaspoon of paprika
1/2 teaspoon of freshly ground black pepper
1/2 teaspoon of freshly ground red pepper
1/2 teaspoon of coarse salt
1 bay leaf per fillet
1 cod fillet per person
Instructions
Combine all ingredient and mix well.
Add the cod fillets and marinade for 15-30 minutes turning once at the halfway point.
Grill the cods for 8 minutes flipping once during the halfway grilling point and grill until opaque throughout.
Serve with your favorite sides and enjoy!
Notes
Always start your grill first so that the coals ash over. If cooking veggies on the grill, cook them separately from the fish and start cooking them first, but it all depends on how you really like your cooked veggies; so I suggest you experiment with the veggies cooking times. If you like them soft, then start cooking them first before the fish hits the grill.
It has been two weeks since I last had the opportunity to post a recipe. I had been under the weather for a while, which means; I neither cooked or grilled. Ouch! Thank God I feel better and nothing was really serious. Other than the fact that I have diabetes M., I feel good about myself and have already posted a recipe under the chicken category, which I hope you will enjoy. I already am starting to receive likes through my facebook account.
So, without no further adieu… the grilling show must go on.
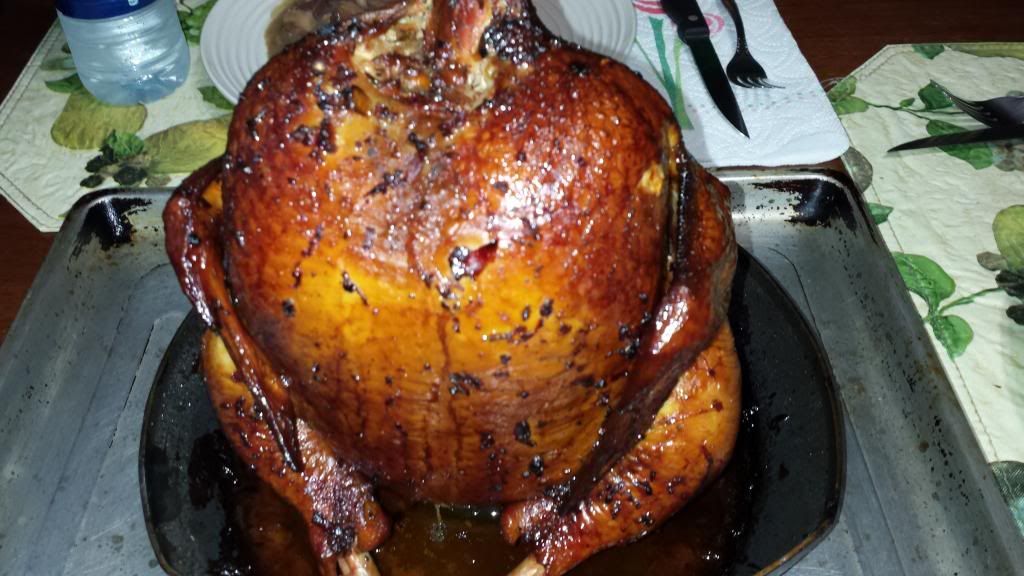
This is definitely tastier than the chicken of the sea! Grilled and smoked over a Hickory fire for 1 hour; this chicken was easily coming apart and was sooo good and juicy.
“THE CHICKEN…”
Drunken-Chicken-with-friends.
“So… Not to be the “Party Pooper”, but don’t drink and drive.” Or do something stupid that you might regret later; all because you had a little too much. You will one day get a DWI or worse?
MEMOIRS
I still recall my tour of duty in West Germany; when Germany was still divided, back in 1986. My friends and I were taking turns drinking upside down hanging from the window ledge from a third story building. Hell, it was fun; it always is when you are in a drunken state. In one of those, someone let go of the persons leg to get a drink and for that short second; everybody sobered up pretty quick. That person hanging upside down did not fall, but could have. I don’t think it would have been a pretty site at all if he did fall upside down from a third story building. I thank God no one fell and I started drinking more responsibly after that evening. We all can have fun; but let’s do it more wisely.
Needless to say, we all know what might happen to drunken people…eventually.
“What happens to drunken chickens?” Well, they get broiled, cooked, or in this case; grilled!”
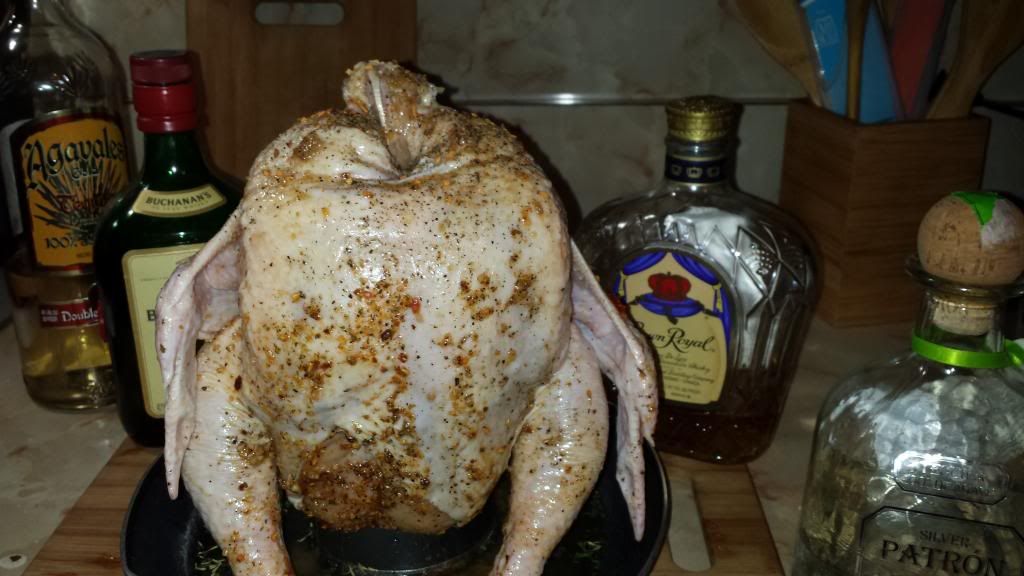
Spiced with an ounce of Crown Royal, 1 tablespoon of McCormick Grill Mates (I used Backyard Brick Oven), and about a tablespoon of olive oil to lightly coat the chicken.
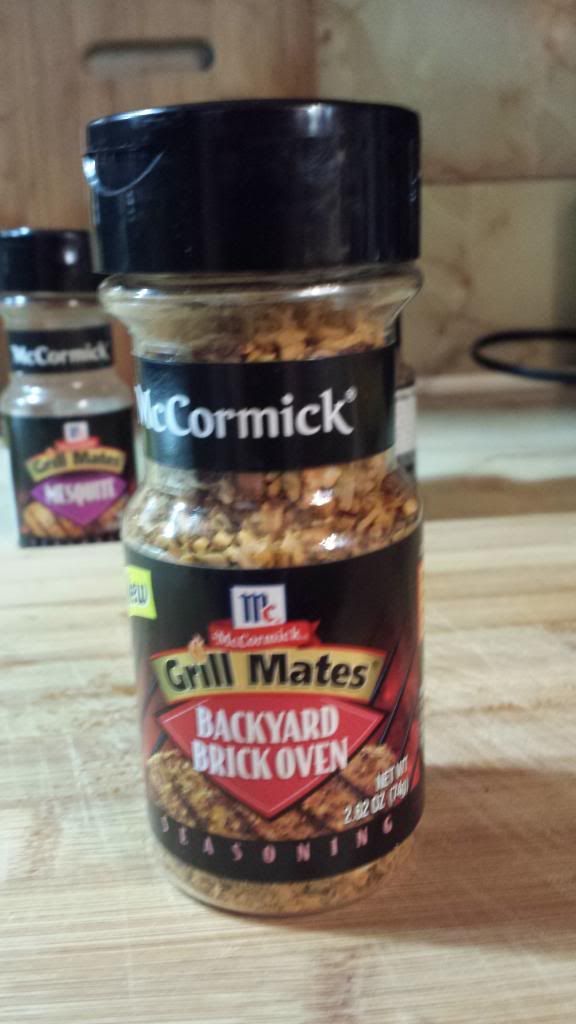
McCORMICK GRILL MATES
MCCORMICK-GRILL-MATES-BACKYARD-BRICK-OVEN
I really enjoy using McCormick’s seasonings. This has about 11 seasoning in one can already mixed up and ready to use. By using this, I didn’t have to add the freshly grounded pepper or the coarse salt. It is already included. I do at times add to it. For example, I might add lemon zest or some other ingredient depending on the “taste buds” of the day are feeling like. This one appears to have an equal amount of basil, oregano, black pepper, salt, garlic, red pepper, sugar, onion, tomato, red bell pepper, paprika, and a citrus additive.
The only problem I see in using any of this multi-spice products is if you don’t really like one of the spices; in which case you will be better off mixing your own and creating your favorite blend.
So, I have lightly coated the chicken with olive oil and lightly sprinkled the chicken with the seasoning (inside and out). As for the Crown Royal; I am using an cast iron container made from Weber that holds your favorite concoction in the middle. The cast iron plate has an insert shaped like an upside down snowcone that holds the chicken upright and lets steam rise up into the chicken through vents at the tip. I also add a little water to the cast iron plate for moisture. Works great on the grill or in the oven. I’ll see if I can post a picture in the BBQ tools section. You can also use an aluminum can and add your choice of concoction, insert it into the chicken, and place on grill. The chicken legs helps stabilize the chicken in an upright position. Also works great. Another tip is to put the can and chicken on an cast iron pan and add a little bit more water. This way the pan will catch any juices from the chicken and steam them right back up to the chicken for a more juicer chicken!
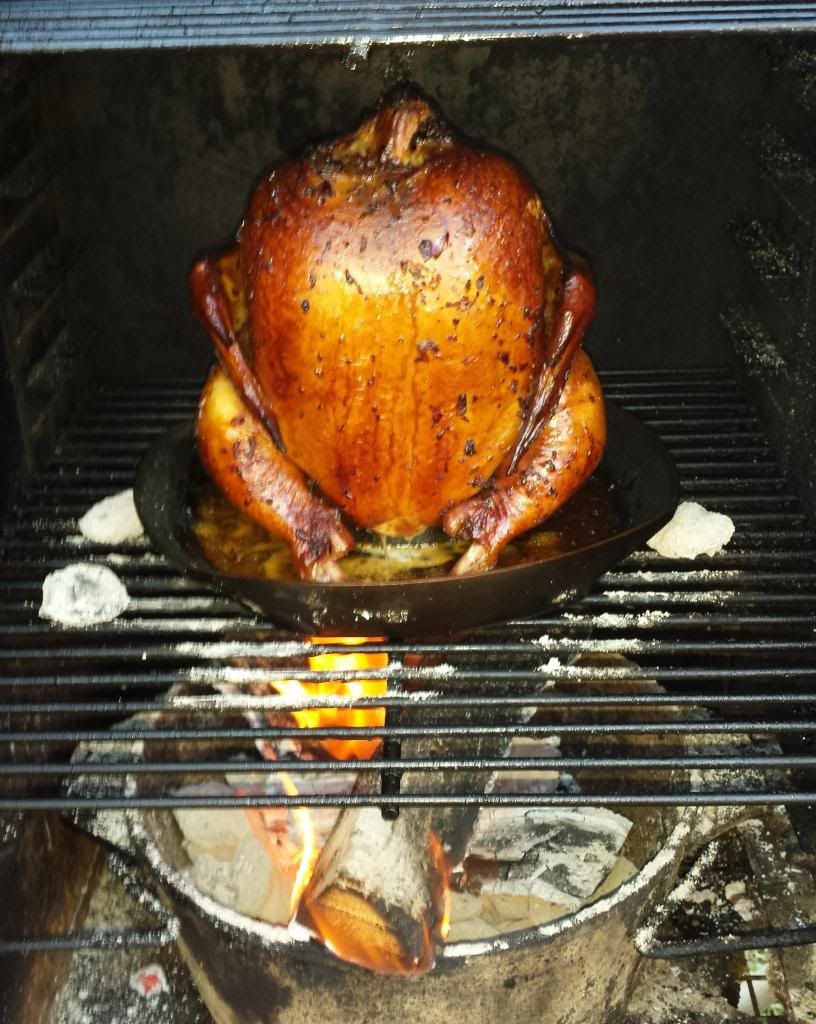
THE GRILL
“THE-DRUNKEN-CHICKEN-1-HOUR-AFTER”
As usual, I started the fire with coals and later added the Hickory chunks and logs. I then added the chicken and this picture is after 1 whole hour of grilling. Keep checking that the plate has water so that the chicken will come out more juicer. This chicken is ready for the dinner table. For calorie counting folks; remove the skin, it is where most of the calories are located (about 1/2 the calories). I ended up serving this chicken with fried Spanish rice and a 26 different bean soup which also had salt pork for a richer flavor. “Yum-Yum!”
This is a super easy recipe; you can substitute the Crown Royal with beer instead. This chicken is really delicious and juicy when cooked as directed and the Hickory fire adds a rich bacon like flavor as well. "Good eating!"
Ingredients
1 whole chicken
1 tablespoon of olive oil
1 tablespoon of McCormick Grill Mates; Backyard Brick Oven.
1 ounce of Crown Royal.
Instructions
Have the chicken at room temperature and rinse in cold running water.
Pat dry and lightly coat the chicken with olive oil inside and out.
Sprinkle seasonings inside and out.
Using a suitable aluminum container (beer can or soda can will work fine) add the Crown Royal and water 3/4 full and insert the can into the chicken's cavity, so that the chicken is sitting on the can in an upright position. You can either place the chicken like this on the grill or you can put this combination on an cast iron pan big enough to hold the chicken in its upright position. If you do, add a little bit more water to the pan. The chicken will be juicer and the pan will be easier to clean afterwards.
Grill over direct heat for 1 hour or until the juices run clear when poked in the breast and thigh sections.
Enjoy!
Notes
The prep time includes the coals ashing over, so start your fire first. Remember, you can remove the skin and save over 1/2 the calories.
This site is about creating flavorful-mouthwatering dishes with smoke, fire, and spice that anyone can create to impress that special someone in your life…or just for yourself!